Quantcast
Channel: David Western's Portland Eisteddfod Lovespoon
Viewing all 75 articles
Browse latest View live

WE'RE BACK!!!

$
0
0


I'm very excited to announce that a date and place have been decided for this years West Coast Eisteddfod!! It will be held at the Multnomah Arts Center in Portland, Oregon on Saturday October 13th and once again Laura Jenkins Gorun and I are teaming up to produce the Eisteddfod Lovespoon.

As in previous years, the lovespoon will be raffled off to a lucky winner who will be announced at the Eisteddfod event in October. The money raised from your generous donations to the Left Coast Eisteddfod will go directly to supporting the event. Each dollar you donate will equal one chance to win the spoon. Naturally, I would like to encourage you to donate many dollars so that your chances of winning improve, but even if you can only afford one or two, please join in as every single dollar is important! After all, it only takes one ticket to win...there's no reason why that ticket shouldn't be yours!!

We are also thrilled to announce that brilliant Celtic artist Jen Delyth has contributed to this year's lovespoon design!! Jen has kindly donated one of her lovely 'Tree of Life' designs and I am chomping at the bit to get to work carving it!! Building on the tree of life theme, we have decided that 'Celebrate Your Roots' will be the motto for this years lovespoon; a motto which is also perfectly apt for the entire Left Coast Eisteddfod!
Celebrating our Welshness AND one of our endearing and enduring Welsh traditions (three cheers for lovespoons!) is what the Eisteddfod Spoon is all about and we very much hope you will support us in our endeavour!

Please join Laura, Jen and myself in supporting the Left Coast Eisteddfod 2012 and earn yourself a chance to win our spoon while you are at it!!


We're underway!!

$
0
0
Bookmark and Share Jen Delyth contributed a beautiful "Tree of Life" design for our fourth West Coast Eisteddfod lovespoon! I'm very excited about it as I have always wanted to try carving one of Jen's stunning Celtic designs in wood and now have my opportunity! This year's spoon will be quite the collaboration and will focus around both the 4 theme (as it is the forth year of the Eisteddfod) and the theme of 'Celebrating Your Roots'. I have taken a bit of time and have embellished Jen's Tree with a nice, simple Celtic 'heart' knot, which I think is most apt for a lovespoon. I've also included the theme "Celebrate Your Roots' in both Welsh and English in Celtic font. The resultant 'rosette' feels and looks pretty sweet and is going to be a lot of fun (and hard work) to carve.
With this part finished, I am going to send the design down to Laura Jenkins Gorun to see what kind of wonderful magic she can add to the overall idea. We've discussed a couple of ideas already and Laura is ready to try a couple of design themes out. So next week, we should have a better idea of how the entire handle and bowl arrangement is going to play out.
 I've also received word from Ceri and Gaabi over at the Left Coast Eisteddfod that we've got yet another exciting announcement to make about this year's lovespoon draw!! From Ceri: "This year there will be an additional prize. The winner of last year's Poetry and Storytelling Competitions, Chris Chandler, will be a judge at this year's event and will be composing a short poem on the theme 'Celebrate Your Roots' which will be printed, framed and presented along with the spoon to the winner of this years draw."
 It was Chris who came up with our Celebrate Your Roots theme and if you are familiar with his work, you'll know that this poem will be a corker!

 With four very talented contributors to this year's spoon, we have a very deep well of artistic talent to draw from! I am hoping that you will be inclined to stop by and visit everybody's work at their websites, which follow below!
 To see Laura Jenkins Gorun's gorgeously delicate lovespoons, visit: www.jenkinslovespoons.com
 Be dazzled by Jen Delyth's Celtic art at: www.celticartstudio.com
 Hear Chris Chandler's word craft (including my personal fav Beyond Pollution) at http://chrischandler.org
 Me? I'm at: www.davidwesternlovespoons.com

A step back, and a framework...

$
0
0
Bookmark and Share

Laura here - Dave let me have a whirl at the blog this week. After Jen's lovely "Tree of Life" design, Chris' inspiring "Celebrate Your Roots" theme, and David's beautiful integration of them both with the addition of some of his fantastic knotwork, it's about time I start contributing something, anyway, I think. I believe when Dave left us last week, he mentioned I'd be trying to come up with some kind of "magic" to lend to the overall form of the spoon. Hmm. No pressure, though... ;) Ha.

I wish I could just come back with something as finished and beautiful as everyone's done so far, but, well.... I like to think I'm not completely insane. ;) Realistically, I knew it was probably time for a step back. After the initial discussions with Dave, my task was to go away and work on a general framework that would include 4 balls in a cage made of roots, growing out of a bowl, then reaching up to form a handle that would include Jen's tree of life with some stuff Dave was going to build up around it, and possibly some other element topping it all off. In the midst of this discussion, Dave had also sent over a rough sketch showing me that we were on the same page with our thoughts of an underlying very organic root/vine framework - whatever shape it may be. We talked about this very modern, organic look, but also talked about "Celebrate your roots" hinting at tradition. Before I even had a chance to get to my drawing board, Dave came back with the lovely rosette we saw in last week's blog, so I had that to keep in mind, too. I asked him its size, which helped me start thinking scale, and right away, to be cautious about letting the size get away from us.

So, with all these thoughts in mind, I taped together two large pieces of tracing paper, some print-outs of the rosette at different sizes, and sat down at the drawing board. Hmmmm.

....

Well, I had to start somewhere, so I started with the bowl. I think I drew about a dozen bowl shapes, but finally arrived at one I liked well enough at least to move on. Then, I started drawing some roots growing out of it, coming together to begin to form a cage. I had lots of thoughts about caged balls, definitely about how the cage will be organic and irregular, and NOT with straight bars, like a normal cage, and I thought about proportions of all the parts and all the mechanics of it.... then started to draw it, when I quickly realized that drawing something organic really can't be sketched - because nothing is left to the imagination like you can do with regular and geometric shapes. So I'll really just needed to  draw an example, not necessarily a final drawing here. So I drew roots up from the bowl to the base of the cage, then erased them and drew them again, then erased and re-drew, ..... several times... And about now, I also became overwhelmed with questions, many coming from the compulsive planner in me, and suddenly I was stuck. So here's the beginnings of a root cage coming up from a bowl just to give Dave an idea for the direction I had in mind, but I really haven't even begun to draw in the complexity of the cage that I have in mind, though it may give you an idea of where I'm going with it:

It's probably less obvious here because I've erased about 20 versions, but I was lost in the details. I needed to get back to the overall framework, but how to get on with that? Hmm... then all the questions kept popping up in my head again, like - Who would be carving what parts, because that could affect proportions a lot, and did Dave have any great desire to carve the caged balls? - that could be REALLY fun, so if he wanted to do it, I didn't want to take it from him. And what dimensions could we work with, and how small did he think we could get this rosette, with it still big enough for him to be comfortable carving it, because I was mapping out some proportions and it could get really big? and did he have something in mind for the top of the spoon, because I couldn't really think of anything? And did he have some kind of wood in  mind, because this will be a big one, and could we get a big enough board? And who would carve the bowl? And I shared an idea I had for keeping the design unified by having each of us take a couple passes building out the root/vine/foliage framework - so what did he think of that? And did he have thoughts for any other elements he'd want to include? And who would carve first this time? I think I even mused over a rough schedule.... I'm sure there was more... Dave patiently indulged my incessant questioning, and, after some discussion, here are the resulting framework sketches I sent him - keep in mind, the circle is the rosette you saw last week, the bowl is smooth and solid, the narrow part above it is a root cage with 4 balls, and everything else (for now) is an unspecified density of loose, organic roots/vines/foliage:


 You may notice, these are all symmetrical. I did actually try some asymmetrical shapes, but didn't come up with any that were good. I don't know if that's because I just couldn't come up with any (sometimes you just don't have the muse for these things, when other times you do), or if perhaps I just still had that "roots" hinting at "tradition" idea that Dave mentioned still in my head. Regardless, I asked Dave if any of these appealed to him, and he liked the second one, so that's what we'll use. Progress! Yay!

So - Next, he was beginning to have a flurry of ideas for more elements to build around the rosette, and he'd need a cleaner, more refined version of the frame to work with, so I sent him one - and I thought it might be useful to also see the rosette in different sizes and positions. I'd printed it out, now, in sizes ranging from 4.5 to 7 inches, looking at it in relation to tools, etc., and decided it looked too small any smaller than 4.5 inches, and probably looked best between 4.5 and 5 inches, depending on what else he'd put around it. Anyway - So here's some of that thought process, in pictoral form.

 That's a 6" ruler there, to give you some perspective... Then, to try out different sizes, in different places....

 
Oh, and I sent him a nice, clean blank one, too, so he can place the rosette exactly where he wants it.


I think the next step is to actually build out some detail here in the bottom half, while Dave plays a bit more with these ideas he's got to build more around the rosette, and then we'll hopefully have two parts we can start to figure out how to integrate soon. I can see us getting very carried away with this one... this is going to be fun!!! You'll definitely want to get lots of tickets for your chance to win this one!

Approaching the cage...

$
0
0
Bookmark and Share
Laura here, again... I think I mentioned already that I was a little excited at the prospect of making a cage of roots. As much as people always seem to enjoy moving parts, I thought this might warrant a little further discussion.

Hmm. So, when I started thinking about approaching the cage, I thought, what are the defining characteristics of the cage? Is it that there are 4 posts? Not necessarily, but there usually are 4, and they are usually all parallel, evenly spaced, relatively straight and usually the back posts are aligned behind the front posts when you cut the blank.

Yeah - I didn't want to do that.

Really, the main considerations for designing balls in a cage have to do with carving and finishing access, and containment of the balls. More specifically, having access for your tools (including your hand holding the tools, in the positions you need, with the leverage you need) to all parts of the inside and outside of the cage and the balls, not to mention being able to hold the work piece without breaking it while carving and finishing the cage, the balls, OR any other part of the spoon! AND, the other big consideration is that you need to make sure to keep the balls contained. No escaping! There's a balance to maintain.

Now, when Dave and I decided we'd have 4 caged balls in this spoon, I immediately started to think of how to make it different than the typical caged balls. I envisioned roots and vines, and even took a few pictures....

So here I was, having all these lovely visions of organic, climbing, meandering roots, and then I think of a typical cage. Here's a typical very simple cage with a couple egg-shaped balls, so you can see what I'm trying not to do, too:


This one only has two balls, and it's laying on its back, so they're spread out. If it had four, the cage would probably have been longer, and when it stands upright, as spoons usually do when they are displayed, they'd all just sit in the bottom, and you'd have a boring, empty cage. So I also figured I'd subdivide the cage a bit, either with branches, or by the irregularity of the posts themselves. And since I'd do that, I guess I didn't need to have all the balls the same size, either, which could allow me some more interest with the thickness of everything, too. That's another thing about cages - they to some extent need to be as deep as they are wide. So - with avoiding a plain cage in mind, here's the first thing I drew...
 
I was a little worried I might scare Dave too much with that one, though (it kind of abandons all the helpful tools like symmetry, parallel lines, reference to the front & back of the board, etc.) so I drew another, a bit more like the typical form...


Note - on this second one, I may have some of these tapering posts opening up a little too much, but I figure we'll probably build them out a little more with some more foliage or something. It's just a start.
Anyway, I really liked the first one. But the more I thought about it, those nagging questions kept coming back to me - like - What kind of wood are we going to use? Who is going to carve first? Anyway, I sent them off to Dave to make sure we were even still on the same page, and see what he thought about either of them.

He liked the drawings, and confirmed that direction-wise, we still seemed to be on the same page, which was great to hear. Of course he had the obligatory words of caution about the twisted cage, which I fully expected and absolutely fully agreed with - I just AM, perhaps, a little bit of a glutton for punishment. ;)  While he was reviewing them, I think another consideration started to bother me, though - and that was about strength. I am really counting on a pretty strong wood choice, I think - and even with a strong wood choice, all the weight we're talking about having in all the rest of this spoon may be too much. This only represents about the bottom half of the spoon - and by far, the lighter half. The twisted cage doesn't stay with the grain of the wood - so it loses a significant amount of strength that way. So - I decided I may just save this one for something smaller of my own, and try again for our root cage here. So I shared my thoughts with Dave, told him I thought I'd go for something in between the two drawings above, with a little more focus on strength, and by the way, what wood did he want to use? 

So, this is what I drew next.

I've heard back from Dave, and we agree - we'll go from here with the cage. Still don't know what kind of wood he has in mind, though. ;) I know he's working on all sorts of wonderful things up around the tree in the upper part of the spoon, though, so I'm looking forward to seeing what's next!!!


Don't forget to get your tickets to win this spoon! I really think something special is brewing here!

WooooHoooo!!

$
0
0

 Wooohooo!!  I'm going to interrupt the flow of the Eisteddfod lovespoon blog to vent some of my excitement about the advance copy of my newest lovespoon book, "History of Lovespoons" which I just received from the great folks at Fox  Chapel publishing!!!

Its even more beautiful in real life than I could have hoped for when I was typing up the rough draft!
I think it is far and away the most informative, thoroughly researched and extensively illustrated lovespoon book on the market.  Although these little snapshots I took with the old point and shoot camera hardly do it justice, it will at least give a jist of the beautiful lovespoons that can be found inside!


 With an exhaustively researched section on the history, myths and symbolism of the lovespoon, this book will hopefully debunk much of the fanciful twaddle that appears on many commercial sites. Historical lovespoons from Wales and continental Europe show in rich colour what lovespoon carving is all about!   I received wonderful support from many museums throughout Wales, Sweden, Norway and Germany and the beautiful spoons they allowed me to show here are worth the price of the book many times over!  This is a chance to see some spectacular collections without leaving your armchair!!!
 The book also goes into great detail explaining the symbols found on historic and modern lovespoons.  There is even an entire section which explaining the meanings of various spoons part by part.  (The photo here shows a beautiful old 3 bowl spoon from the fabulous collection of the National History Museum of Wales at St Fagans.)

 Concluding with a lovely gallery of modern work by some of the top lovespoon carvers from around the globe, this is a great opportunity to see what is going on with lovespoon carvers throughout the globe.  With spoons by Alun Davies, Mike Davies, Sion Llewellyn, David Stanley, Adam King and Ralph Hentall, there is no doubt that a wonderfully wide range of styles and techniques will be on show!!  The lovespoon is a versatile thing and the design possibilities are virtually infinite, so I am super- excited to be able to highlight so many lovespoon carvers whose work I admire so much!   Its an absolute treat to have them all here in one place!!
Bookmark and ShareNaturally, I want to show off Laura's page!   She and I are putting the finishing touches to our 2012 Eisteddfod lovespoon design and should be posting it very soon.  We lovespoon carvers generally work alone, so it is very exciting and challenging to team up and do a spoon which combines very different design styles and very different approaches to carving and technique.   But if the last spoon we did together was anything to go by, we'll both have a great time and some very lucky winner will walk off with the fruits of our labour!!

We just might have a design!

$
0
0
Bookmark and Share

You know - when I talk with people about lovespoons, they often ask about whether it bothers me to always have to part with a spoon after having put so much of my heart and soul into it, not to mention the hours and hours of hard work. I generally give the same reply: Nope. Lovespoons are, after all, meant to be given away, and I just think the world needs more lovespoons. But, I digress. Getting back to the point I was intending to make: this spoon, I think, even though I'm only one of four contributors to it, may be the first one I think might give me a bit of an ache when I part with it. As I've watched the design develop, I keep thinking this one just seems special. I determined long ago that I if I ever get a lovespoon, I won't get it myself, because I'm a girl, so I won't buy a chance at it. But YOU can!  I feel compelled to say - if you haven't already bought your raffle tickets for this year's spoon: you should. Just click on the "Donate" button at the right to make a secure payment to buy your chances. It's only a dollar for a chance! And you'll be supporting a really terrific cause! I wonder if everyone reading this realizes what an opportunity there is here.... it's a little bit amazing to me. Just sayin'.... 

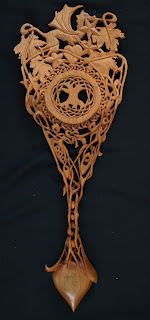
Well, back to the spoon... Dave and I may be jumping ahead a little, but that's only because we're pretty excited that we think we may have just finished the design! I'll try to include a few notes Dave gave me along the way, here, but there will probably be some reviewing of more of how we got here in later posts.  So here it is!


But, I guess I should elaborate a little about how we got here...

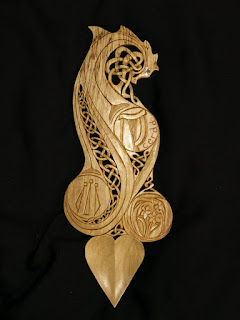
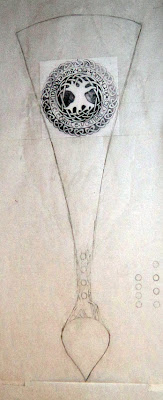
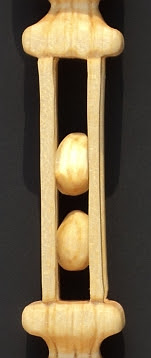
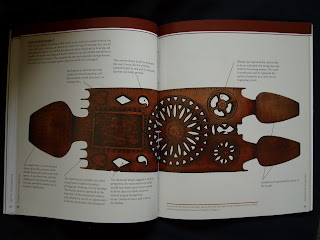
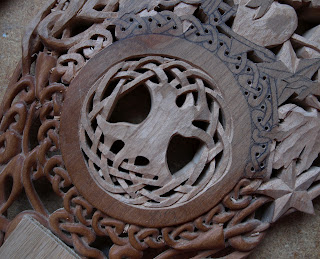
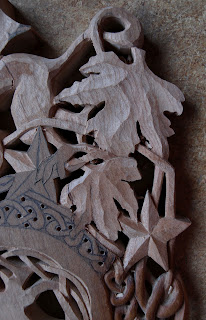
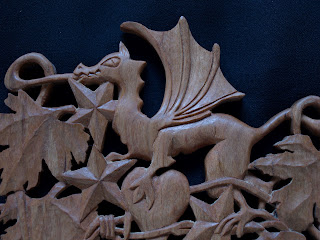
Last time I wrote, the cage was pretty much settled, and Dave was working on some ideas for what to do in the upper part of the spoon, building around that medallion, with that generally tapered overall frame-shape. Now, Dave had mentioned he had an idea for a dragon above the medallion - hinting at Welsh roots - maybe some maple leaves and stars, too. I was very curious, but also very busy with several other spoons and a lovespoon workshop, so I just tried to leave Dave alone and wait. Eventually, I heard from Dave that he was struggling with a bit of designer's block (I sympathized), but he pushed through it, and before long, he came back with this, with the accompanying qualifier that he wasn't happy yet with the dragon.

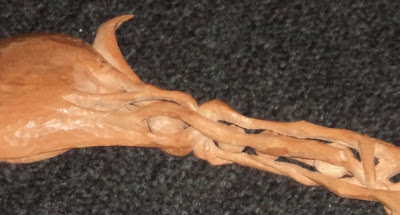
Since he wasn't quite happy with the dragon, he suggested that I should feel free to try to "jazz him up a bit." We had also talked about running some vines (or roots) through/around the upper part, and he said he had tried adding in some vines, but felt it might be starting to look too busy, but maybe I'd have more luck with it if I wanted to try. Knowing I still needed to draw the lower part to come up and meet this part, he suggested that maybe we could have vines intertwined around that lower part, around the ends of the tongue and tail. He also mentioned that he was working with a 4.25" diameter circle, there, but I could probably increase it to 4.5" if I felt like it needed to,  or even go as small as 4 inches before the medallion started becoming too tricky to carve.

When I saw this, I was a little surprised because it wasn't what I was expecting - although, I wasn't sure what to expect, either - so I just had to think about it for a minute. In our first discussions, we did talk about a root framework for everything, but we also talked about having some other big element above the circle, crowning off the top section of the spoon, but we couldn't seem to come up with what that element would be to put up there then. So I don't know if I even mentioned that part of the original plan before, but anyway - this was definitely a return to the original plan. And I really like it when Dave makes maple leaves. I also love the dragon's wing, and what he's done with the tongue and tail. But I wondered what, specifically, Dave didn't like about the dragon, if he wanted me to try my hand at it.
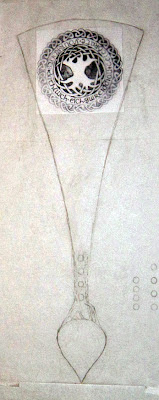
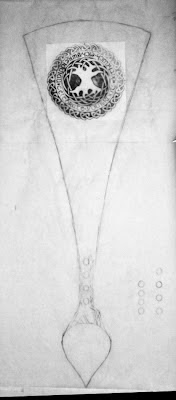
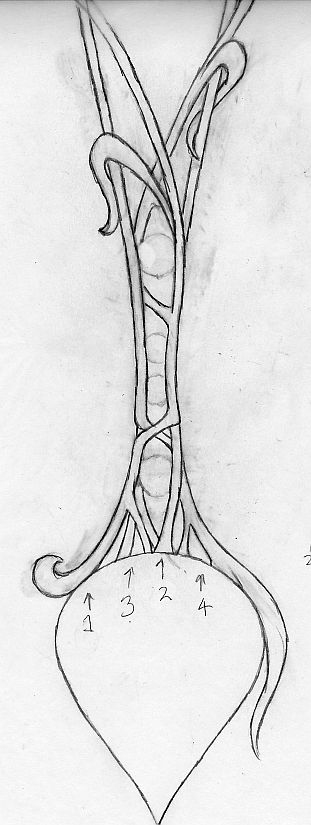
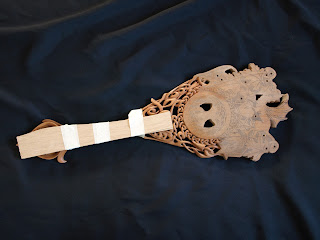
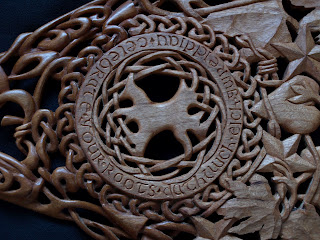
And then I started to wonder whether Dave had looked at both parts together yet - he hadn't mentioned. I was curious about something, but needed to see everything together. Bringing everything together would be the next step, anyway - so at my next opportunity, I printed the image above so that the circle would measure 4.25", and got out my print-outs from before, and looked at them together. I looked at the 4.25" version, which fit, and the 4.5" version, which also fit, but felt a little more securely. So, here are both parts together.


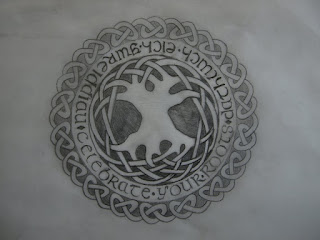
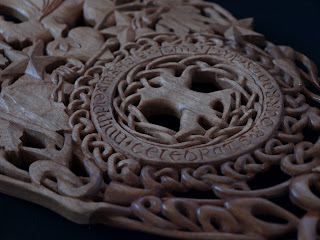
I didn't shade in the negative space yet this time, but remember, also, the medallion is largely fretwork, while the leaves and stars and dragon are all solid figures. So, then, the thing I was wondering before was this: would these two parts look harmonious and integrated, or would there be a distinct difference in proportion? Remember - I had already spent quite a bit of time contemplating that medallion at those smaller sizes. Looking at them together, I did feel like there was a small disconnect, but at the same time, I saw what I thought might be a pretty simple solution.

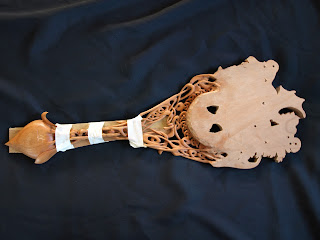
I proposed that adding few thinner vines (about the thickness of the vines in the knotwork around the medallion, or the tree) up in there as a transitional element might actually be just the thing to blend the two parts together. Yes, it would add a little business, but it needed a little business, to match the business of the fretwork within the medallion. Anyway, Dave seemed to agree about the disconnect, and about the proposed solution, so that was simple enough. As a bonus, it might help with that overall continuity to have a bit more of some organic stuff in that upper section, too, since there is a lot in the lower section. Likewise, I now knew I would need to add more non-organic stuff in the lower section, too.

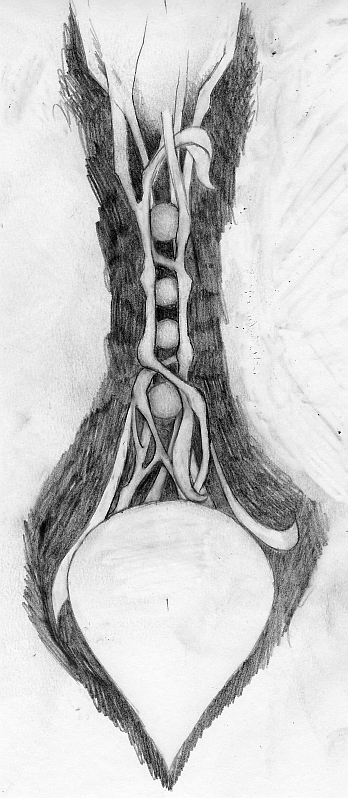
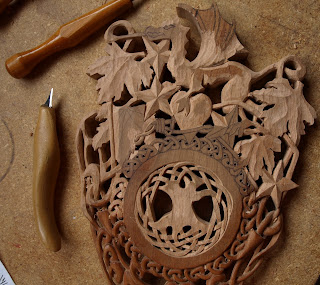
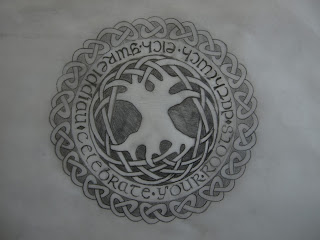
So - I do ramble, don't I?! Sorry about that. A lot happened. Well - first things first - I asked Dave what he didn't like about his dragon. He said he didn't like its face, but also said I should play with any other parts, and make him look "more serious", if I wanted. So I started with the face, but then, just for fun, I did play with a few other parts, and here's what I sent off to Dave....

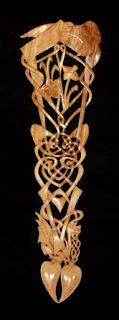
Dave wrote back saying that he liked it, and he thought we should run with it, so I said ok and moved on to the next step. So, the next step was to patch this together with the lower section I'd done with the cage. I laid out a center line - decided the points of the heart would define vertical - and placed everything so that tip of the bowl to the top of the dragon's wing is about 21 inches - the previously-agreed length, and also marked out 3.25 inches left and right of the center line in the top area (7.5 inches total width), just to help keep track of the balance. Then it was just a matter of drawing.

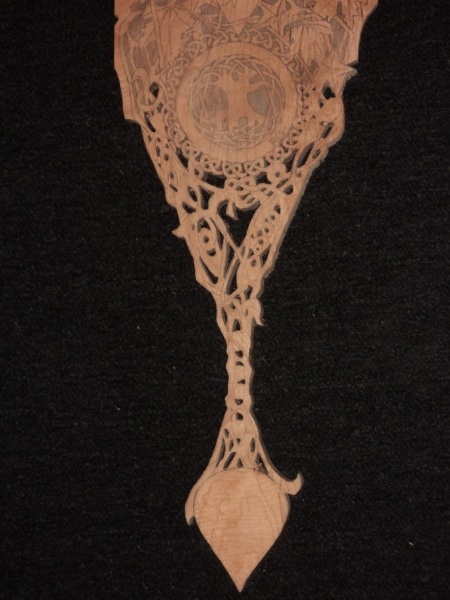
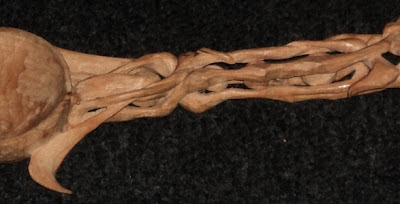
Now it was my turn for designer's block. I had been so focused on roots, but just roots and vines would be too much organic, and wouldn't really have any continuity with the upper part at all. While I thought about it, though, I added some of those filler vines through that upper part to temporarily hold everything together (Dave could totally change them if he didn't like them - just as long as he still made them as thin as the knotwork and tree, so they serve that transitional purpose previously discussed) Also, I think I had them all beginning and ending somewhere, but I was a little sleepy, so he needed to check, if he didn't want to change them all together. I tried to do things like twist multiple vines together so that they were in bundles, but weren't really that fragile, or laid them against leaves or other things, so they still had that thinner scale like the knots and tree in the medallion, but also had strength. Anyway... eventually, I figured I would start by mirroring the heart Dave had put above, only I'd make this one out of a vine, kind of like a bit of grapevine. And then, for some of the other areas I needed to fill, I'd make up some knots. I tried to give them a feel kind of like what Dave had with the tongue and tail of the dragon, again, trying to carry some uniformity through the design. Definitely David Western inspired knotwork. :) Oh, and I kind of abandoned some of the constraints of the framework shape, too... I really don't know what made me do that. Hmm.


Anyway, here's the first draft I sent him...


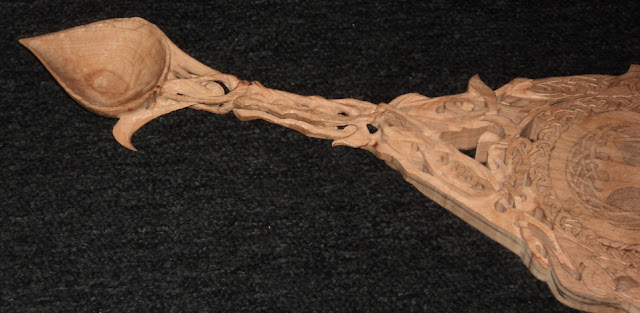
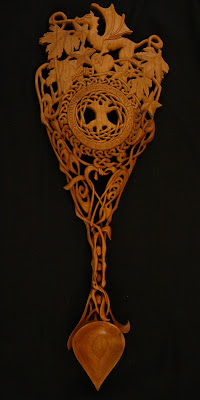
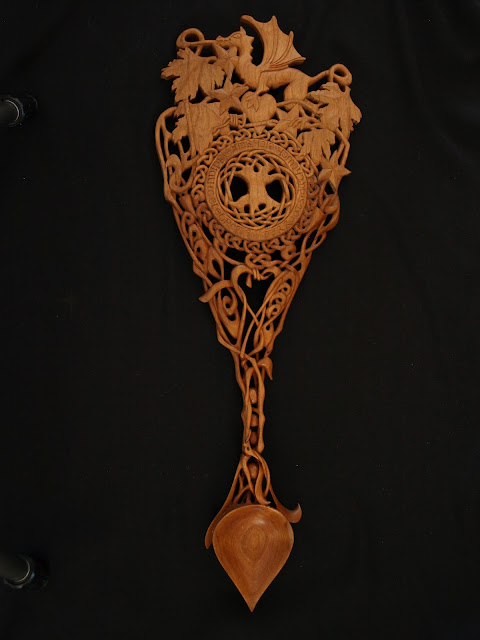
Well, Dave liked it. He even liked the vines through the upper part - although he did have concerns about the thinness of some, and did find a few mistakes where I'd lost track of some vines. So I made a few fixes, had a few second-thoughts, re-arranged a few things, and beefed up a few vines I thought might be giving Dave a little extra concern in that upper part, and here's where we are now.


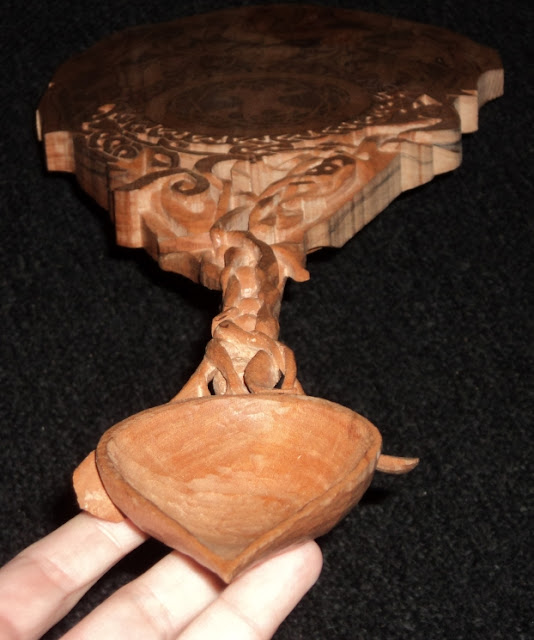
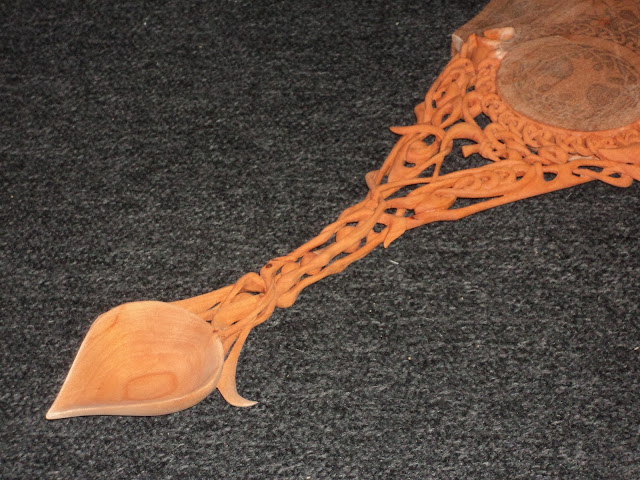
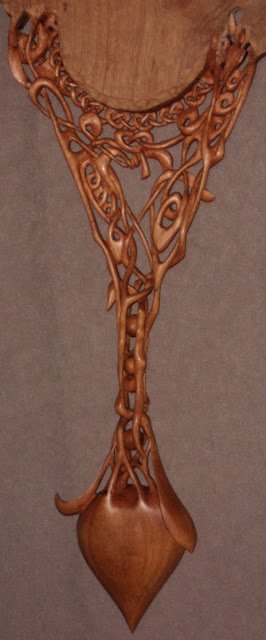
So here we are! Looks like we have a design!

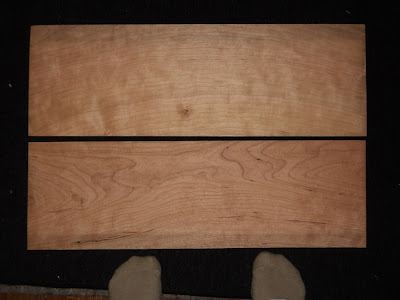
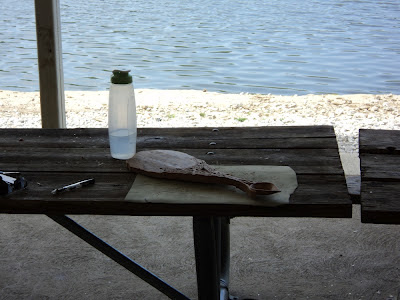
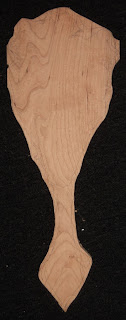
OH! by the way, this spoon will be made of a nice cherry board that is sitting next to me right now.


A PLEA!

$
0
0

Laura is just about set to start cutting out this year's West Coast Eisteddfod Lovespoon, but before she does, I wanted to take this quick opportunity to ask for your support!  As everyone is well aware, times are getting tougher and tougher and money is getting tighter and tighter.  It's become extremely difficult to stage any kind of event these days as sponsors dry up and potential attendees try to decide whether they can afford to go out or not.  
Things are no different for the West Coast Eisteddfod.  As a grassroots production, the Eisteddfod feels even the slightest drop in support in a big, big way.  This lovespoon helps to cushion the financial impact of weakening sponsorships by providing a fund-raising opportunity for the Eisteddfod.   Anyone and everyone is most welcome to donate to the Eisteddfod and in exchange for their generosity, will have the opportunity to win the spoon when it is drawn for at the Eisteddfod this October.  Every dollar helps to ensure the Eisteddfod's continued existence and every dollar could be the one that wins the spoon.  
I urge you to consider donating and to encouraging your friends and relatives to do the same!!  Each dollar you donate equals a ticket in the draw...the more you donate, the more tickets you get!!  But it only takes one to win and if one is all you have, we are more than happy to accept it!  Naturally, we hope that you can give more...but every single dollar helps us out during a very hard time!!
There aren't too many Welsh events in North America...please help us to keep the West Coast Eisteddfod running!!!
Donating is easy... just click on the orange "donate" box located to the right side of this blog post.  Its completely safe and secure and you will NOT be hassled with spam and further money requests.  We do our begging here, in full public view and hope that it is enough to encourage your generosity!!
This spoon will be our best one yet and we guarantee that whoever wins it will be getting a deal and a half!!
On behalf of the West Coast Eisteddfod, Laura and myself,  we thank you if you have already donated and we thank you in advance if you haven't quite gotten 'round to it yet but are planning to soon!

Progress!!!

$
0
0

Bookmark and Share

Did you think we had thrown in the towel? Naaaaa - Dave and I have both just been swamped with each of our own commitments on our respective ends of the continent. I can't believe it's already late July! Well, in any case, as much fun as I had finishing up several other projects over the last several weeks, my focus has finally been able to shift to this wonderful project. I honestly wasn't procrastinating - I have been chomping at the bit to get to it! I think this may prove to be one of the most fun spoons I'll ever get to carve, so I wanted to make sure I could give it the focus it deserves.

So here we go! I had two cherry boards that were large enough for our spoon, and I had to choose one...

Each board had its pros and cons, but after placing the pattern in various positions on each board, I ended up choosing the lower board. The lower board ultimately won the edge because (and you can't really see this here) it had fewer unavoidable little knots. I think I was able to avoid all but one, and also place the pattern so that the spoon's bowl fell in an area of the grain I hoped might be especially pretty, since that's the largest solid area where you'll actually see the grain.

Now - since Dave and I live about 2500 miles apart, and in different countries, we'd be wanting to keep shipping to a minimum. That meant we'd need to carefully consider the order in which we do things. If I carved first, would Dave want to do his own sawing on his part? I would completely understand if he did, as I know I sometimes make minor adjustments to the design while I'm sawing, so he probably would like that flexibility, too. It would also leave him more flexibility with any of the more irregular depth decisions. But if he did want to saw his part, would the part I'd already carved be able to stand up to the vibration from the angle grinder while he rough-shapes the back of his section? (that couldn't be done ahead of time, because he'd need the flat back for sawing). I didn't know, because I've never used an angle grinder. I was willing to learn to use it, but didn't want to cost Dave any flexibility of sawing and shaping the back on his part himself. Anyway, after discussing these considerations, Dave felt it would be safe for him to saw and rough-shape the back even after my carving was complete, so we may as well leave him that flexibility.

I would, however, rough-shape the front of the blank. After getting some tips from Dave on using the angle grinder for that task, since that would be a new tool for me, I ended up opting for a hand-plane instead. Had I been planning to saw everything and hollow out the back, too, then I'd have learned to use the angle grinder. Perhaps I still will, some day. :) You may think I'm just being a girl with my avoidance of power tools, but I am actually perfectly comfortable with most. It's the little, hand-held ones that make me uncomfortable. Well, those, and I also have an irrational fear of routers. But I digress....

So, the first step was to decide exactly where to place the pattern on the board. I did that, marked the outline, and then sawed about 1/4 inch outside of that (more, in some places).


And then, I moved on to shaping it with the plane.


By the way, Dave and I also talked about that 3rd dimension of the handle - we both like to make arcs, so the fronts of our handles tend to be convex, and the backs, concave. But I think that arc normally goes in a vertical direction for both of us (or, sometimes both vertical and side to side). This time, however, since there are the cages there at the throat of the spoon, just above the bowl, it changes things a little. Cages are deep - You can't really make the part of a handle including a cage thin. So, I thought it might look more natural to have that arc going from side to side this time, more than from bottom to top. If you think of the handle like a paper scroll, rolled towards the back plane think of those edges that roll on the sides instead of on the bottom and top of the handle. Anyway - so that's why I planed it the way I did, as you saw above.

Next, I needed to get the pattern onto the board. Some people like to actually take a paper copy of the pattern, and glue it to the board. A big benefit to that is that there is more contrast. On the other hand, I sometimes can't see well enough WITH the paper, because it starts coming up, and I lose track of where I was supposed to be sawing. Instead, I tend to transfer the pattern with carbon paper onto the face of the board. In this case, since it's so easy to get confused about what is negative space and what is not, so I also filled in the negative spaces (most of them, anyway) with pencil, so I could keep track. Dave may still prefer to stick a copy on there, and I'll make sure he has one that's the right size, but meanwhile, I have it directly on the wood.

Next comes the drilling, then sawing...


Well... I think that's about enough rambling for today. Next up is the carving. I hope you'll check in on us again very soon! Meanwhile, click on the donate button at the right, and follow the instructions to make your donation to Americymru's West Coast Eisteddfod to get your chances at winning this spoon!


Carving fun cages

$
0
0


Bookmark and Share 
Time for some carving! But where to begin....?  Well, sometimes that's a little bit of a dilemma for me, but this time, I actually had put some thought into it while I was still working on the design. This time, I'd start at the bottom: the bowl. Then I'll work my way up. I've mentioned before how concerned I have been about the spoon holding up around these frail little cages, so I want to get all that extra pressure from carving away all that excess wood around and inside the bowl before I get started on the cages.

I started with the back/exterior of the bowl. Now, after a few hours' stretch, something usually happens that makes me chuckle. I thought it might make for a good opening picture for this post....
 and here's actually the back of the bowl...


Anyway, after the dog returned to his usual spot on the back of the sofa, I spent a few more hours removing the interior of the bowl. This is a pretty simple task (certainly the simplest feature on this spoon), but labor and time intensive. And, the bowl is an important part, too - it deserves careful attention. People always ask me how long it takes to make spoons... so, I think it took around 8 hours of carving to get to this point, just to give you an idea. Yeah - cherry is kinda hard.

 
One thing I learn in the process of carving the bowl is what this particular piece of cherry is like. Now, I know I pushed for cherry because it's stronger than some other woods, but another reason was that cherry never seems to vary as much in hardness or other carving characteristics as other woods. So, naturally, as I carved the bowl, I discovered that this particular piece of cherry seems to be at least as hard as any cherry I've ever used, and it also seems to be a little more fussy, and likely to tear with certain approaches to the grain. It still carved better than a lot of woods, though, so I do still think it was a good choice.

Please note the size of those chips up there, too.... on most spoons, those would be pretty normal-sized. On this one, however, we won't see many more nice, big chips like that. Normally, for the rest of the spoon, I would use my 8mm #5 gouge for 80-90% of the work. This time, however, I got to use that "big" 8mm gouge for maybe 5% of the carving, if that. I'd end up using mostly my 3mm #5 gouge. Lots of hard-to-reach areas on this one, where the 8mm gouge just wouldn't fit. To some extent, I anticipated this, but I'll give you, I didn't effectively factor it into my estimate for how long all the carving would take. 3mm vs 8mm - well, you do the math. :) The other big learning experience for me this time: all these different, interweaving vines & knots and third-dimension decisions (that I didn't draw out - I usually make those up as I go) aren't so bad each by itself, but having them all so close together makes a big difference. My spoons are usually so much simpler, the mid-carving thought process doesn't usually take up that much time. This time, however, it may have been one of the biggest factors. It's so easy to get lost in all that detail, especially when you're flipping from front to back, and sides, and the relationships between all those details. I want vines to act like vines, and knots to act like knots... etc.

Well... that was a lot of words. So - here are a lot of pictures, as the cages developed. Still, from bottom to top...

Note the size of the chips.... see what I mean? That's all I'd see for a while...
Oh - and you may notice the light is different here, too - that's because these were taken where I normally carve once a week:


Next to the river. :) Nice. Then back to my usual arm-chair, and more work on the cages...

 Getting into the back.... and now lots of thinking, checking where I am about to carve, following vines through the cages and up the handle.... into the bowl... etc......
And finally, freeing the ball in the first cage... see it in there? now I have a very-large-handled rattle. Ha. This cage was awfully fun. Interestingly, while it took a lot of thought and very careful concentration throughout the carving process, there was a trade-off. One challenge missing from this cage that is often important in other cages - there are no straight lines, and no need to make one part look exactly like another part. Straight lines and symmetry are tricky. However, while I don't have to worry much about symmetry - I do have to think about balance, and making the roots/vines actually look like roots or vines. They are also not as much fun as this organic stuff. So - more fun through the rest of the cages...


Note - I'm having to start working a little higher up the handle to make sure I'm putting everything in the right place - again, keeping that "big picture" view, and overall balance.


A note about caged balls: they are still just a matter of carving away everything that isn't a ball or a cage. At this point, I've freed the ball in the upper-most cage, too. But, I think the biggest challenge with them (especially when you don't have to worry about symmetry) is getting to clean up the inside of the cages, and shaping the ball. I like to try to get the ball as round and smooth as I can before I free it. That usually requires pretty small tools, and certainly very small chips. These cages were all actually mostly a little bit larger and more accessible than I'm used to - the ones I've done before, I put near another element, blocking access on one side, and that sort of thing. Still - with all those vines around them - especially in that lower cage, it was a little tough to see whether the ball was actually round. Then, once I DID free each ball, my fingers didn't quite fit in there, so it's really tricky to secure it for further carving. Eventually, I came up with a solution to that problem, but I'll explain that another time.

So, I eventually freed the remaining balls, and got to a point where I felt like I was finished with the cages. Just a few more pictures of the cages to leave you with, for now. Next time, we can see what happens above the cages. Meanwhile - I REALLY hope you'll consider making a donation to help support the West Coast Eisteddfod (there's a "Donate" button at the right on this page), to get your chances to win this spoon, and encourage the making of more, in future years!


 Oh - one more note - I'm pretty certain that I had something different in mind for the third-dimension of the cages, that would have had more connections from vine to vine (more like what's above the lowest cage). I know my original plan wasn't as open as this. I don't remember exactly what that original plan was, so I just made it up as I carved, knowing exactly how strong things actually were now, and apparently, this arrangement is what struck my fancy while I carved.


Completing carving of "part A"

$
0
0


Bookmark and Share

Well, time for the rest of my section, up above the cages.
Here, I was looking to check those vines coming up from the cages - even while I was carving the cages, I had to think about not only the depth level of those vines that were the cage, and following it up each of those vines, but also the overall profile of the spoon as it flattened out, and reached towards the top. I wanted to curve down the sides a little, to help with the transition of the thick cages to the flatness of the rest of the handle, but also keep the lower part of the handle a little nearer to the front plane than higher up. This goes back to that challenge of making the vines look and behave like vines. Vines wouldn't bend back and forth the way the ropes in knotwork do - they might bend around something, but it's a more gradual bend. So, trying to do that as much as possible, there was quite a lot of thought that went into any part that reached into or around another part. I think of the bends in knotwork as being completely flexible, because there's been human intervention, bending the ropes in a knot. Vines, on the other hand, grow into the path of least resistance - they don't usually choose a path that follows the perimeter around another object/vine (well, sometimes they do, and I included one of those in that heart in the middle, but that's a different thing).  So that's what I was thinking, anyway... just in case you wondered. ;) I don't know how well I succeeded with carving the vines to look "natural," but at least that was the intent.

Anyway - I was thinking the cages would have been the hardest part. I was wrong. I seriously under-estimated something. I have carved my share of fretwork before - even tight fretwork like this - but there were two key differences this time: 1) there was a LOT of it, in a relatively small space, and 2) it was mostly pretty irregular, not in repeating patterns. While there was  no single element that seemed so unusual, having a whole bunch of detail all crammed into a relatively small area added a substantial challenge I had definitely overlooked.  I actually felt the need to keep a print-out of the design with me while I was carving, just for reference.

 However, the really hard part came along when I'd flip it to carve the back. I found it incredibly difficult to keep track of where I was, and keep the exact part I was carving in my mind's eye. I think it was the irregularity that made it so difficult, because once I marked out the over/unders on one of the little knots surrounding the tree, the rest weren't really any trouble.  In hindsight, if I ever do something like this again, I'll simply draw out the back, too, so I have it for reference. Why I didn't stop and do that this time - I couldn't tell you. But had I done it, that probably would have spared me many hours of staring and thinking. :) The fretwork was so tight, I couldn't see the over-under of the other side from the back, so I had to think it through from the front-side print-out I had. This was even after I'd scooped away as much of the excess depth as I was comfortable removing. I guess I usually have quite a lot more open space involved in my fretwork. I thought that was just my design sense, but now I see there was an added benefit I didn't even realize before!
I think the irregularity was the worst part. At least in those knots surrounding the medallion, once I found my way around one, from the back, all the others fit together the same way. In hindsight, I'd have spared myself from a lot of confusion on the back if I'd just stopped and drawn out the back on a piece of paper, so I could have it as reference, just like I had the front drawing as reference. I should have stopped to do that, but I suppose I couldn't see the forest, for the trees! I know for next time, though. :)

Oh, and I held off on carving that leaf sticking off the side there, higher-up on the handle, so that I wouldn't break it off while I was carving up there. I'd carved the leaves sticking out near the bowl, but I'd already gotten used to keeping them safe, so they were pretty much out of the way now. 

The plan was that I'd carve probably up to somewhere around the tips of the tongue and tail, and I'd probably get into the knots that the other parts of my carving would touch on the lower part of the medallion. As I was carving away the back, I realized that those vines that reach most of the length of the spoon (into Dave's section) could end up at a variety of depths, depending on what Dave wanted to do. So, near where those met Dave's section, I didn't completely carve them, so I could leave him some flexibility in his placement of those. 

In the same way, I wanted to carve some of those little knots next to the medallion, since the other stuff I was carving next to them touched them, and they sort of inter-acted. Also, the part where the words will be seemed like a good stopping point, since I could keep the back flat pretty much where Dave will be sawing, too, and its shape is relatively straightforward.

So, eventually, I decided enough was enough, and it was time to move on to sanding! I inevitably find little pieces that I think need to be thinner, or corners that need to be sharper, etc., when I'm sanding, so there'll be a little more carving (even though that's bad for my tools) while I'm sanding. But, for the most part, here it is, finally - "carving part a" complete. Yay!


Well, that took - oh... about 3x as long as I expected. Hmm. So much for getting better at estimating! Ahh, the dangers of lack of experience...... Sorry, Dave! One day, you'll get your chance at it!!!

Next - SANDING!

Nooks and crannies...

$
0
0

Bookmark and Share
Last time, I  was ready to begin sanding. Lots of sanding....
I usually start at around 80 or 100 grit - especially for the larger areas like the bowl. This first grit of sanding inevitably reveals little connections and overlaps that I end up wanting to carve to refine a little further, again, this time more than usual. I think I even made 4 or 5 new piercings, not to mention sharpening lots of little corners, and maybe even a little slight re-shaping here and there. With all the nooks and crannies, the needle files were a big help this time, too. So, I find that the first pass probably takes 4 or 5x as long as any other grit. I assume, also that the reason for that is because I don't carve nearly as cleanly as someone like Dave. That means more shape refining in my first pass. It's probably been years since Dave's had to deal with that issue.


Next came 180, 220, 400, 600 and 800. In these pictures, it was at 800, and still drying the first time. You can see, the scratches are pretty much gone, but the surface still looks pretty rough after wetting it this first time. Through these first several grits, my main focus is removing scratches from the previous grit, or from the carving tools as well as I can. By 600 or 800, it starts to get a sheen, and it mostly stops creating dust. At this point, I like to wet down the spoon with water to bring up the fibers of the wood (I just pour water all over it). Then, I repeat 800, wet it again and see if it roughs up any more. Once it doesn't rough up after wetting it, then I move on to the remaining grits.


So - it looks rough here, because those little fibers are all standing up, but it wasn't long now, before I was through all the rest of the grits (about 9 more). Probably only 3 hours or so.
At this point, I think of it more like polishing than sanding, so I don't feel the need to get all the way into every nook and cranny with these very high grits. Of course, that's why these higher grits go so quickly. There's no more dust, and no more scratches, but if I can see a difference in the polish with each grit, then I keep going until either the polish stops improving, or I run out of grits. With most of these harder woods, that's usually 12,000.
Someone said something about video... so, I figured I'd give it a try. I don't think I'm any good at it - hope you don't get motion sickness watching it! Anyway, here it is, with the sanding all done...


Last thing - maybe a coat of oil to protect it a bit... Earlier, I was thinking it might be better to just leave it sanded, not oiled, but after seeing how dirty it got from handling it, I changed my mind, and decided a coat of oil would be a good idea. Also, I finished it on a Saturday, so I couldn't mail it until Monday anyway, so why not?

Here are some pictures against a medium-color background, just for a change of pace.


Well, time for me to part with this thing. That was really really fun! Thanks, Dave & friends at Americymru for letting me be a part of this! I can't wait to see Dave bring the top alive, and pull the whole thing together - It's definitely becoming reality. My only regret is that it took me so long. Sorry, Dave! Don't forget to get your tickets - you really won't want to miss your chance at this one!

Next, packaging it so it won't break in the mail, and then we all get to see Dave make it into something really special!

Article 13

$
0
0

Bookmark and ShareLaura at NAFOW

While the West Coast Eisteddfod lovespoon wends its way through the labyrinthine complications of US/Canada cross-border customs, Laura is taking a well deserved break from carving to man her booth at the North American Festival of Wales.   This year's event is in Scranton Pa., and it sounds like it's quite the bash.   If you are planning on attending, or you are in the Scranton area this weekend, please drop by Laura's booth and purchase one of her beautiful lovespoons or greeting cards!!  If you are too late for a lovespoon, (I hear they are going very quickly) check out her equally beautiful hand-turned pens.  There's no end to Laura's woodworking and artistic skills, so take advantage of this excellent opportunity both to meet her AND to own some of her elegant work!
If can't visit the event, please visit Laura's website at www.jenkinslovespoons.com and check out her gorgeous collection of lovespoons!

Laura and I are both very excited about this year's Eisteddfod spoon and hope that you will help us with our fund-raising effort as we raffle the spoon off to a lucky recipient at this year's West Coast Eisteddfod.
Every dollar you donate to our cause equals a chance to win what must surely be our best spoon yet!  Laura has thrown down a mighty gauntlet for me this year and I am very keen to see our spoon sprung from its custom's purgatory so that I can 'resume the action'!!   Again, if you are at NAFOW, drop by the Americymru booth and have a look at the photos of the spoon and its progress from plank to perfect!   
If you can't donate in person, please click on the box to the right of the photo for full information on this simple and safe way to support the West Coast Eisteddfod!!


Mair's Beautiful Tree

$
0
0


One of the great things about lovespoons is that the process of their creation  allows for a great deal of client involvement.   In fact, the more my clients are involved in the design of the spoon, the more likely it becomes that I can capture something which really says, ‘them’.
Every now and then a client comes along who already knows exactly what should be carved and presents a sketch or idea which is pretty much ‘ready to go’.  Such was the case with this lovely tree design by Mair Underwood.  After we had swapped ideas back and forth for a while, Mair sent this lovely design which she felt really captured her relationship and which was, for her, full of meaning.  Not only that, it makes a truly beautiful lovespoon!!
Its also the first design I’ve done where the spoon is made to hang horizontally rather than vertically as is customary.
I really love this elegant little spoon and I hope that inspires you to design a lovespoon of your own (or work with me to create one if you aren’t as handy with a pencil as Mair!!).

While we wait for the West Coast Eisteddfod Lovespoon to clear customs, please look back over some of Laura's progress reports to see how the spoon is shaping up and see some excellent pics of its progress so far!!  Please also consider donating a buck or two to the West Coast Eisteddfod for your opportunity to win the completed spoon!!!

Hurry Up and Wait

$
0
0
Bookmark and ShareWe're just waiting for our lovespoon to clear Canada Customs. As soon as it does, I will resume work on it and finish off the beautiful Tree of Life design so graciously contributed by Jen Delyth.  As with all things bureaucratic, we don't really know how long a wait we'll have, so in the meantime we'll carry on posting as if nothing's happening....which, alas, may well be the case.  I don't even have any photos of it to post, so if you want to see how it currently stands, you'll have to scroll back a couple of posts to the lovely one Laura did showing all the work she has currently undertaken.
The picture I've included today is of a lovely walnut spoon carved in Celtic style and taken from an old panel of wood which was rescued from a dumpster by a friend of mine.  The panels are probably around 200 years old (or more) and came from an old bar which had been used on a ship and in an Irish pub....if this piece of wood could talk, it would, no doubt, have a lovely accent and would be full of the blarney!
This particular design combines several examples of Celtic art extending over a time range of about 2-3 thousand years.  Although we are most familiar with the insular style of monastic Britain (circa 500 ad -800 ad), there is a rich and varied history of lovely Celtic art which is hardly known.  With the theme of this year's West Coast Eisteddfod lovespoon being, "Celebrate your Roots"...this spoon certainly sums up the Celtic pride that we Welsh and our fellow Celtic cousins can feel in our long and varied history.
The West Coast Eisteddfod gives us a chance to highlight our Welsh pride and to bring some aspects of our history and culture to the community.  Lovespoon carving is certainly one of those Welshy 'things' that we can feel pretty good about and it gives Laura and I a LOT of pleasure and pride to see our combined efforts result in a beautiful spoon which a lucky draw winner can enjoy for many, many years.
If you haven't already donated to the West Coast Eisteddfod, please consider doing so.  Every dollar you donate (in denominations large or small) equals a chance to win...so the more the merrier!  We're confident this year's spoon will be far and away the best one yet and will represent exceptional value!!
Please support our cultural efforts and help the Welsh presence within North America!

David Western's Portland Eisteddfod Lovespoon: Hurry Up and Wait


My Turn!!!

$
0
0

Bookmark and ShareI've got a confession to make.  For the last month Laura and I have been having a private heart attack as our West Coast Eisteddfod lovespoon negotiated its way through the border/customs process of international mailing.  Owing to poor old Laura getting some completely duff information from US Postal, the spoon wound up being tremendously overinsured and then triggered a customs charge of nearly 200 dollars at the border!!  Since neither she or I could pony up that kind of dough and since the whole idea of the lovespoon is to raise funds rather than spend them, the only option left was to send it back to customs and appeal the charge.  Needless to say, it was a long, nerve-wracking ride for the pair of us and we were getting fairly certain the project would not be happening this year after all.   BUT, Canada Customs came through with an expedited processing and we are now back in business!
I'm really excited to get going with some carving of my own, but before I do, I have to quickly blog and let everyone know how BEAUTIFUL this thing is so far!!  Laura has done a lovely job and the 4 balls rolling in their organic cage look fabulous.  It's got the trademark Jenkins Lovespoons delicacy and elegance and is wonderfully 'touchable'.  Whoever wins this thing is going to be over the moon...  it is easily our best spoon so far and its not even done yet!!!
So, to keep on track for the Eisteddfod, I will be getting my head down and my backside up for the next few days.  I'm hoping I can make good headway and keep the project on track for the big day in October......not so very far away now!!
If you're wondering what all the tape and plywood 'crutch' is all about, there's no breaks or anything, I just want to protect Laura's delicate work while I am bashing away on the scroll saw.  I think I would have an aneurism if I managed to break it after all we have been through...so for the next little while it will be behind scaffolding!!
Even if you could give a tinker's damn about Eisteddfods or anything Welsh, Laura and I both hope you'll fall in love with our lovespoon and want to have it (or even better, you'll want it to give to your sweetie)
Please consider donating a couple of bucks to the West Coast Eisteddfod and you could win this lovely, lovely spoon!!

Jen's 'Tree of Life' Takes Root!!

$
0
0
Bookmark and ShareI'm underway on the 'Tree of Life' section of our West Coast Eisteddfod lovespoon.  This beautiful design was graciously given to us for use on this year's spoon by the extraordinary Celtic artist, Jen Delyth.  It's always been a particular favourite of mine, so getting the chance to carve it is very exciting.  As you can see, it's early days yet, but it is starting to take shape and I'm getting an idea of how it will look when I'm done.   I will most likely leave each root and branch slightly 'textured' rather than going for the very smooth  effect which Laura has achieved on her section of the spoon (the part which is slightly darker in colour).  I'm hoping that by leaving it a bit textured, it will separate the intense knotwork sections and make each easier to 'read'.   Of course, its always possible that my idea won't work out and so it will be one of those last minute decisions whether or not to sand them smooth after all!!
I've also started roughing out the maple leaves, the stars and our little Welsh dragon.  The cherry we are using has some really lovely grain which I think will accentuate the leaves very nicely!  Unfortunately, there is an odd bit grain running through the dragon's body which might give me a bit of a challenge.  Nothing that some aggressive cuts and maybe a dab or two of crazy glue won't take care of though!! 
 There's a LOT of scroll sawing in this year's design...it always seems much simpler and straightforward on paper...so I'm just plugging a way a segment at a time.  Things are pretty tight on this one, and I'm finding that it is easy to get 'off course' if the old attention wanders a bit.  So short but intense bursts of sawing activity will be the order of the day for the next little while!
So here's where things stand at the moment!   With time flying by at what seems an accelerated rate this year, it feels like I am up against the wall a bit.  I'm hoping a few long sessions this week will help me to get back in control of the time and have the spoon in the post for Portland on time. 
This year's spoon is going to be an ABSOLUTE CRACKER!!!  With contributions from 4 artists, the West Coast Eisteddfod lovespoon is definitely our most complicated and elegant effort yet!  If you haven't donated a buck or two to the Eisteddfod, don't delay!!!  October 13 will be here in a flash and that is the time when someone lucky is going to win it!!
There's a LOT of artistic, design and craft skill in this piece and it could be yours for just one dollar!!  Every dollar you donate to the Eisteddfod equals one chance to win....and somebody is going to be that one!!!  
Please help us to help the West Coast Eisteddfod grow and flourish!

DONE!!!!!

$
0
0
Bookmark and ShareI've just put in a 3 day marathon carving session to get the West Coast Eisteddfod Lovespoon ready for its big day!   I'm thrilled to bits with the result and I'm hoping that seeing it done will encourage lots of donations to our favourite cause!!  Remember, this beauty that Laura and I have slogged over for the last few months could be yours for one measly dollar!!!  Every dollar you contribute to the West Coast Eisteddfod entitles you to a chance at winning what is surely our best effort yet!   I defy you to find a lovespoon like THIS anywhere for a BUCK!!!!!!
I think that Laura has absolutely excelled herself with her gorgeous ball in cage detail.  Check out those sinuous vine details!! At the start of this project, Laura was a bit of a grinder with the design and in her own words, 'fussed over every detail'.  Now that it's done, you can see that her efforts were absolutely worth it! Laura and I are in love with this spoon and we don't really want to give it away...but give it away we will!
In case you're wondering why the spoon is sort of two-toned, its because Laura's section at the bottom was carved a couple of months back and is oxidizing.  That rich amber tone you see on the bowl is what the whole spoon will have in another couple of months when my section at the top settles in a bit!  This spoon is going to be a stunner!!!!!
Just to show that we didn't 'leave it all' on the front aspect, here's a picture of the back of the spoon showing that all Laura's meticulous planning has continued onto the back!!  Its like having 2 spoons for the price of one!!!
Man, I just love how Jen Delyth's 'Tree of Life' turned out!  One day it would be fun to try a bigger one and go for a bit more detail on the roots and branches, but for now, this looks pretty sweet!  Trying to remember where all those vines went around the heart, leaves and dragon made me scratch my head a few times and I had to call Laura for a sketch, but in the end its all good!!
And one last treat is this close up of Laura's beautiful work on that cage with the 4 balls (one for every year of the Eisteddfod) which shows just how 'touchable' her carving is!!
I'm totally PUMPED about this spoon...I hope that you will be too!   Just remember that time is rapidly running out for you to get in on a chance to take it home!!!   Please donate to help support the West Coast Eisteddfod today!!!!  Just click on the box at the top right of the page...it's simple, safe, secure and you WON'T get hassled with any unwanted spam from any of us!!


Nearly There!!

$
0
0
With less than a week to go before the 2012 West Coast Eisteddfod kicks off, here's another look at our incredible lovespoon for all of those 'undecided' donors out there!!  If you haven't yet donated a buck or two (or more) to the Eisteddfod, you are going to miss out on a chance to win this spoon for your very own!!!   Each dollar you donate equals one ticket for our big raffle draw during this years Eisteddfod event... the more you donate, the better your odds become!
This is quite possibly the best lovespoon we have carved for the Eisteddfod (although we love them all) and I think that Laura and I are going from strength to strength as we perfect our designing and carving teamwork!!The detailing on this year's spoon is exquisite!  Laura spent many painstaking hours going over my crude sketches to refine the knotwork and perfect her sinuous vine details.  The results of her dedication are plain to see!!!

Our little Welsh dragon strikes a brave (but not unfriendly) pose as he guards over the spoon, his tongue and tail weaving through the 4 Canadian maple leaves and 4 American stars which symbolize the international nature of the Eisteddfod.  Everything is carved on both sides, so this spoon looks great both from the front, or if you hang it up wrong, from the back too!!
This may well be my favourite part of the spoon!   Look at that gorgeous cherry bowl and the way the grain sweeps through it...fabulous!!!  The 4 balls in the organic cage (representing the 4 years of the Eisteddfod) are a carving triumph for Laura.  The detailing and finishing are perfect and I guarantee, the winner of this spoon will spend many hours rolling the little balls back and forth and enjoying the silky feel of the wooden vinework!
And here's one more look at Jen Delyth's beautiful tree of life design which she so very kindly allowed us to use as the focal point for this years Eisteddfod spoon.  I think this lovely tree with its interlocking branches and leaves is the perfect symbol for our Eisteddfod lovespoon...arts and artists coming together in a spirit of cooperation to create an artwork of exceptional beauty!  How sweet is THAT?    

As an additional bonus...the winner of this year's spoon will also receive an exculusive copy of Chris Chandler's poem on celebrating your roots (which was the inspiration for this year's spoon) printed with a high rez graphic background designed by Jen Delyth!   This is a great prize on its own!!!!

So please head to the Donate box at the top right of this page and get involved for your chance to win this beautiful spoon!!   Time is ticking at a brisk rate and you'll kick yourself if that annoying neighbour of yours who always wins everything takes this home too, just because you didn't enter!!!


Bookmark and Share

ONLY HOURS TO GO!!!!

$
0
0
Jen Delyth's Tree of Life design with some additional Celtic heart knotwork.
Bookmark and ShareWith just a few hours left before we close the donation box up and start putting the draw tickets into the drum, you've got a brief chance left to get in on the action!  Our beautiful West Coast Eisteddfod 2012 lovespoon could be yours for just ONE DOLLAR!   Every dollar you donate (just go to the donate box at the top right of the page) entitles you to one ticket in the draw.  The more dollars you can spare, the more tickets and chances you will get!!   It's easy and safe to donate and you won't be hassled with spam or requests for more money!!  
As I look over the pictures of the completed spoon, it's hard to believe that it all came from this one elegant design of Jen Delyth's!   Her 'Tree of Life" design seemed perfect for our 4th year theme of, "Celebrate Your Roots" and now that its done I can whole-heartedly say it IS perfect!!!
From whence it all began!
Now the hard work starts
So with a humble cherry plank and a design which Laura and I had debated back and forth (with rather more civility and decorum than has been seen on the US political scene lately) until we had it 'just right', work began in earnest!  Laura took the bowl end and I went for the top end so that we could each try the sections of the spoon which appealed to each of us the most.   Laura made a beautiful job of the 4 balls running in their little organic cage and after an interminable wait while the spoon wended its laborious way through the labyrinthine caverns of Canada Customs, I got cracking on the 'Tree of Life' and the little dragon, leaves and stars detail of the spoon's crown section.
Hey Presto!!  One Eisteddfod spoon!
It took a little longer than we expected for the spoon to get to me and it made things considerably more exciting as I raced the clock to get it ready in time for this year's West Coast Eisteddfod event in Portland on October 13th.   But as you can see from the pic, we got it done and the spoon has been sent registered, insured and tracking numbered by Express Post!  If the postal services of Canada and the US are anywhere near as good as their word, the package should hit Portland today!!
So there it is....this year's Eisteddfod spoon is ready to go to its new home!   To everyone who has donated, Laura and I wish you the very best luck in winning!!!  To those of you who haven't donated, hit that DONATE button now!!!!


Viewing all 75 articles
Browse latest View live